#amigurumi #freepattern #freepatternamigurumi #crochettoppattern #crochet #crochetpattern
What does amigurumi means?
The word Amigurumi comes from Japanese. The Japanese call handicrafts knitted with crochet and needle as Ami. The Japanese call the toys that are filled with objects such as fibers or cotton as Nuigurumi. The word Amigurumi is derived as a combination of these two words.
Amigurumi knitting techniques are very easy. You can find many handcrafts prepared with these techniques on my site. What is Amigurumi for beginners in Amigurumi handwork? How to knit amigurumi? In this blog, where you can find the answers to the questions with pictures, you will be able to learn about Amigurumi in all details.
I share in this blog are amigurumi cats, amigurumi dogs, amigurumi fish, amigurumi unicorn, amigurumi penguins, amigurumi parrot, amigurumi giraffe, amigurumi pigs, amigurumi bunnies, amigurumi cows, amigurumi sheeps, amigurumi bees, amigurumi dolls, amigurumi snakes, amigurumi mice, amigurumi elephants, amigurumi pumpkins, amigurumi pandas, amigurumi owls, amigurumi cartoon characters, amigurumi twetters, amigurumi caterpillars and more …
Also I’m sharing new amigurumi free patterns every day.
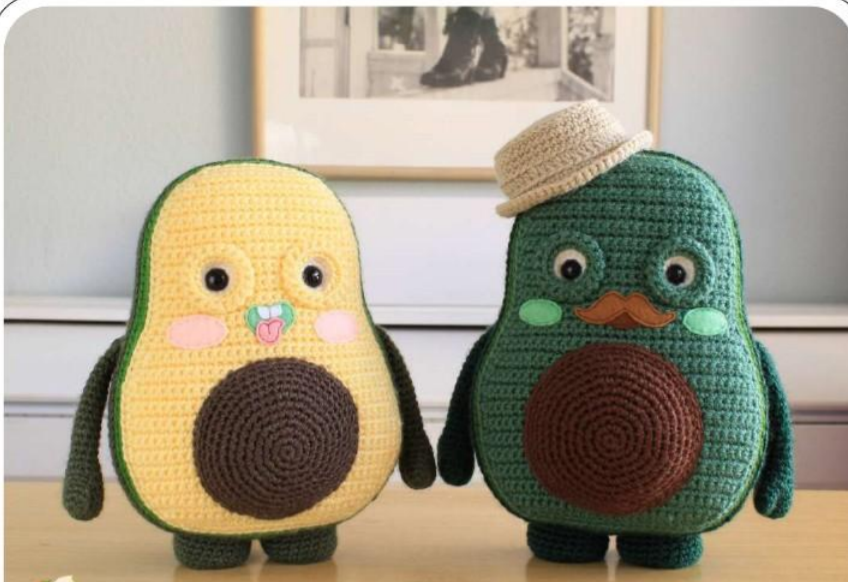
Todays daily new amigurumi free crochet pattern is Avocado.
I want to give you some informations about this pattern;
MATERIALS:
Hook number 3.25
Yarn – acrylic
Filler
Safety eyelets – Ø 12 mm
Needle
Scissors
Markers
pins
Pieces of felt (colors – to your taste)
Sewing thread / Glue
Tips before knitting
Mr. Avocado is knitted from 100% acrylic yarn.
I used two types of yarn of the same yardage (100gr/200m): KATIA “PLANET” and VERTO DI ROMA “VINIA”.
You can use yarn however you like.
For knitting Mr. Avocado pattern for this MK, I used the following colors:
Light yellow
Brown
Light green
Dark green
White
(VERTO DI ROMA “VINIA” – Color code: V14)
(VERTO DI ROMA “VINIA” – Color code: V70)
(KATIA “PLANET” – Color code: 3966)
(KATIA “PLANET” – Color code: 3980)
(KATIA “PLANET” – Color code: 3951)
Work tight with a smaller size crochet hook than recommended for your yarn. I used a #3.25mm hook.
Mister Avocado measures approximately 22 cm.
In MK, three methods of crocheting are used: in rows, in a circle and in a spiral.
Use a marker when knitting in a spiral
Terms – Abbreviations

Dark green yarn.
Rotary rows. We start from the bottom.
Dial a chain of 21 ch:
1: Behind the rear edge of the base chain
From the 2nd st from the hook:
1 inc, 18 sc, 1 inc – (FIGURE A)
2: inc, turn, 1 inc, 20 sc, 1 inc
3: p, turn, 1 inc, 22 sc, 1 inc
4: inc, turn, 1 inc, 24 sc, 1 inc
5: pp, turn, 28 sc
6: inc, turn, 1 inc, 26 sc, 1 inc
7-8: p, turn, 30 sc – 2 rows
9: inc, turn, 1 inc, 28 sc, 1 inc
10-18: p, turn, 32 sc – 9 rows
19: inc, turn, 1 dec, 28 sc, 1 dec
20-21: p, turn, 30 sc – 2 rows
22: inc, turn, 1 dec, 26 sc, 1 dec
23: pp, turn, 28 sc
24: inc, turn, 1 dec, 24 sc, 1 dec
25: pp, turn, 26 sc
26: inc, turn, 1 dec, 22 sc, 1 dec
27-36: p, turn, 24 sc – 10 rows
37: inc, turn, 1 dec, 20 sc, 1 dec
38-39: p, turn, 22 sc – 2 rows
40: inc, turn, 1 dec, 18 sc, 1 dec
41: pp, turn, 20 sc
42: pr, turn, 1 dec, 16 sc, 1 dec
43: inc, turn, 1 dec, 14 sc, 1 dec
44: pr, turn, 1 dec, 12 sc, 1 dec
45: inc, turn, 1 dec, 10 sc, 1 dec
We do not cut the thread, we tie the part in a circle. The yellow dot on the diagram indicates sbn,
blue – an increase.
Don’t forget to mark the first loop so you know where to end the binding.

We continue to knit in a spiral, do not forget to mark the beginning of the row marker
2: 124 sc
3: 23 sc, 68 pss, 33 sc
4: 24 sc, 68 pss, 32 sc
(124)
(124)
(124)
In the 5th row, mark the 46th column with a marker (photo 1), we will need this mark later
to connect parts.
Light yellow yarn.
For the front, repeat rows 1 to 45 inclusive of the back.
We do not cut the thread, we tie the part in a circle.
Don’t forget to mark the first loop so you know where to end the binding.
1: 1 inc, 43 sc, 1 inc, 18 sc, 1 inc*, 43 sc, 1 inc, 12 sc (124)
*IMPORTANT: Mark the 2nd column of increase with a marker. From here you
start row 2.
Secure the thread at the end of knitting with an invisible connection
(see page 27)
We change the yarn to light green and start the 2nd row from the place marked with a marker.
(see photo):
2: 124 ss – BACK HINGE
Do not knit too tight on this row.

124 sbn – FOR THE BACK WALLS OF THE LOOP (124)
guided by photo
Continued on next page.

Before fastening the thread at the end of the row, find and mark the 4th column with a marker
3rd row (photo A), in the future this will help you navigate when connecting parts.
Then secure the thread with an invisible connection.

bone
Brown yarn. We knit in a spiral.
1: 6 sc in KA
2: [1 inc] x 6
3: [1 sc, 1 inc] x 6
4: 1 sc, [1 inc, 2 sc] x 5, 1 inc, 1 sc
5: [3 sc, 1 inc] x 6
6: 2 sc, [1 inc, 4 sc] x 5, 1 inc, 2 sc
7: [5 sc, 1 inc] x 6
8: 3 sc, [1 inc, 6 sc] x 5, 1 inc, 3 sc
9-11: 48 sc – 3 rows
İnvisible compound
We finish the part with an invisible connection, cut the thread, leaving a long tail for sewing bones to the body.
LEGS
(x2)
Dark green yarn. We knit in a spiral.
1: 6 sc in KA
2: [1 inc] x 6
3: [1 sc, 1 inc] x 6
4: 1 sc, [1 inc, 2 sc] x 5, 1 inc, 1 sc
5: 24 sbn – FOR THE BACK WALLS OF THE HINGES
6-9: 24 sc – 4 rows
We finish the part ss and cut the thread, leaving a long tail for sewing. We stuff not
very tight.

ARMS (x2)
Dark green yarn. We knit in a spiral.
For each hand we knit two fingers and connect them together.
Finger 1:
1: 6 sc in KA
2-3: 6 sc – 2 rows
(6)
(6)
Finger 1
We finish the part with a connecting column.
We cut the thread, leaving a tail of about 10 cm.
Finger 2:
1: 6 sc in KA
2: [1 inc] x 6
3-4: 12 sc – 2 rows
(6)
(12)
(12)
Finger 2
After the 4th row, we do not cut the thread, we continue knitting – connect two fingers together.
Thread the tail of the thread that remained on the first finger into the needle and sew between themselves the 6th and 7th columns of the 2nd finger and the 1st and 2nd columns of the first finger. Fasten and hide the thread inside the fingers (see photos and drawings).

Before continuing, let’s check if we did everything right:
You should have four “free” stobs on the first finger and ten “free”
NOTE. Look carefully which of the “free” columns will be used later, and don’t confuse them with connected stitches. We continue:
5: 14 sc – 5 sc (finger 2) + 4 sc (finger 1) + 5 sc (finger 2) (14)
6: 14 sc – fill both fingers (14)
7: [5 sc, 1 dec] x 2 (12)
8: [2 sbn, 1 dec] x 3 – stuff to this place, then do not stuff (9)
9-23: 9 sc – 15 laps (9)
To close the arm, fold the piece in half and knit 4 sc for both sides. cut the thread,
leaving a tail for sewing.

EYES (x2)
We knit eyes in a circle with white yarn.
1: 6sc in KA (6), sl-st in the 1st sc, pp
2: [1 inc] x 6 (12), sl-st in 1st sc, pr
3: [1 sc, 1 inc] x 6 (18), sl-st in 1st sc
NOTE. When tightening the amigurumi ring, do not pull too hard. strongly, since through the central hole we will later insert the eye.
To change the yarn to light yellow, we knit the last ss with a new one color and work 2 more rows (see instructions on next page):
. 4-5: 18 sbn, sl-st in the 1st sbn – 2 rows (18)


Attach the bone to tummy.

We fix with pins and sew in a circle with a “back needle” seam or any in another way convenient for you. Not reaching 5-6 stitches before the end of the circle, bruise the bone a little. Sew up. Fasten the thread from the wrong side with a pair nodules.