
#amigurumi #freepattern #freepatternamigurumi #crochettoppattern #crochet #crochetpattern
What does amigurumi means?
The word Amigurumi comes from Japanese. The Japanese call handicrafts knitted with crochet and needle as Ami. The Japanese call the toys that are filled with objects such as fibers or cotton as Nuigurumi. The word Amigurumi is derived as a combination of these two words.
Amigurumi knitting techniques are very easy. You can find many handcrafts prepared with these techniques on my site. What is Amigurumi for beginners in Amigurumi handwork? How to knit amigurumi? In this blog, where you can find the answers to the questions with pictures, you will be able to learn about Amigurumi in all details.
I share in this blog are amigurumi cats, amigurumi dogs, amigurumi fish, amigurumi unicorn, amigurumi penguins, amigurumi parrot, amigurumi giraffe, amigurumi pigs, amigurumi bunnies, amigurumi cows, amigurumi sheeps, amigurumi bees, amigurumi dolls, amigurumi snakes, amigurumi mice, amigurumi elephants, amigurumi pumpkins, amigurumi pandas, amigurumi owls, amigurumi cartoon characters, amigurumi twetters, amigurumi caterpillars and more …
Also I’m sharing new amigurumi free patterns every day.
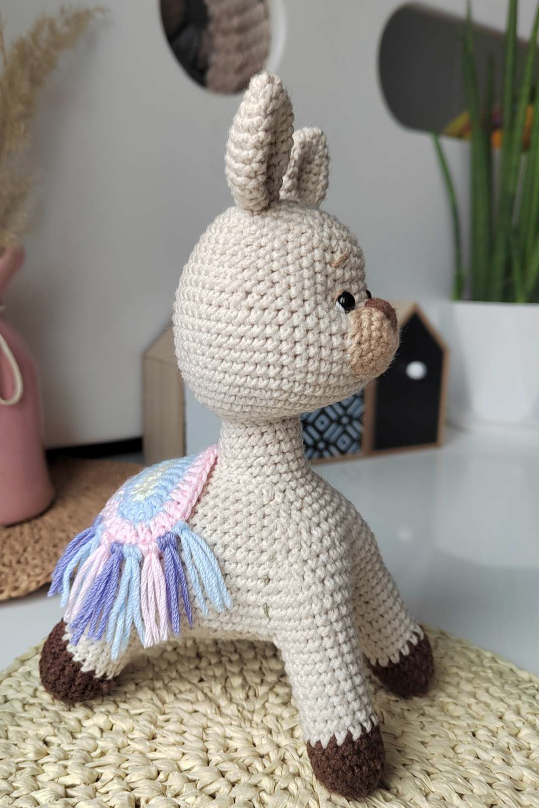
Todays daily new amigurumi free crochet pattern is Alpaca.
I want to give you some informations about this pattern;
AUTHOR
OLESIA SHESTAKOV

NECESSARY MATERIALS
Yarn Art Jeans 50gr 165m
Gazall Baby Cotton 50gr 165m
Alize Cotton Gold 100gr 330m
Yarn
You can use any semi-cotton yarn with
the desired footage in 50g 165m, I recommend
Hook 2-2.5
Scissors
Needle for sewing on ears and ties
Markers, threads in contrasting colors
Tools
Eyes 2-4mm (I have 4)
Buttons for clothes
Yarn for clothes of any color, you can use leftovers
Filler (holofiber, sintepukh)
Decor

TERMS OF USE
All study materials are protected by copyright. Broadcast, copying, resale is prohibited.
Knit in continuous rads, in a spiral, do not make an incline loop in end of the row
Don’t expand a job if it’s not specified
Be sure to use a marker, thread in a contrasting color, mark first stitch of each new row
For knitting toys, you can use absolutely any yarn, if you use a completely different yarn, the toy may be deformed.
Always try to find the right one.
Hook also select based on your density. If you have large holes form, then take a smaller hook
Fill the toy tightly enough so that it does not lose its shape, but also at the same time, it remained soft and pleasant to the touch, and the loops did not stretched and no holes formed
CONDITIONAL NOTATION
vp – air loop
ka – amigurumi ring
ss – connecting column
sc – single crochet
psp – double crochet
ssn – double crochet
pr – increase
ub – decrease
without izm (bi) – knit a row without making decreases or increases, sc sbn s pp – single crochet for the back half loop**
3ssnv1 – knit designation in 1 loop 3 CCH
Pv – turn the work (turning rows)
Add – add, knit another loop, in the course of knitting
SS – connecting post
Mark me when placing this MK in your groups on Vkontakte @Vivi_toys

Knit in continuous rads, in a spiral, do not make an instep loop at the end of the row
Don’t expand a job if it’s not specified
Be sure to use a marker, thread in a contrasting color, mark first stitch of each new row
For knitting toys, you can use absolutely any yarn, if you use a completely different yarn, the toy may
deform. Always try to find the right one.
Hook also select based on your density. If you have large holes form, then take a smaller hook
Fill the toy tightly enough so that it does not lose its shape, but at the same time it remained soft and pleasant to the touch, as well as loops did not stretch and did not form holes
Front legs
Coffee color
1. 5sc in ka
2. 5pr \u003d 10
3. (1sbn1pr)x5=15
4-6. 15sc
7. Switch to milky color 15 sc
8-13. We knit 15 sbn, fasten, cut the thread
Repeat second part
Hind legs
Coffee color
1. 6sc in ka
2.6pr \u003d 12
3. (1sbn1pr)x6=18
4-6. 18sc
7-11. Change the thread to a milky color, knit another 5 rows of 18sc
Fasten cut thread
We knit the second part, do not break the thread, continue knitting
12. We connect the hind legs. 12sc on the leg, 4ch, 18sc on the 2nd leg, 6sc by VP. 6sc on the first leg.
13. 12sc, 5sc on ch, 8sc on the second leg, 1ch, we will knit the stomach turning rows, knit in the other direction a new row
14. 21sc, ch 1, unfold knitting
15. 21sc, 1ch, unfold knitting
16. 21sc, ch 1, unfold knitting
17. 1dec 17sc 1dec, = 19p 1ch, unfold knitting
18. 19sc
19. 1dec 15sc 1dec, = 17p 1ch, unfold knitting
20. 17sc
21.1dec 13sc 1dec, = 15p 1ch, unfold knitting
22. 15sc
23. 1dec 11sc 1dec, = 13p 1ch, unfold knitting
24. 13sc
25. 13sc
26. Now we attach the front legs. 5sc together with the front foot, 3 sb on the body, 5 sb with the other foot. Next we will knit in a circle
https://youtu.be/KoZ1xu0C6Nk connection of legs of a toy without holes
Turning rows on a toy, we knit an Alpaca belly – https://youtu.be/nEB-mV0i1SU
First row of strapping

LEGS 2 PIECES
27. We put the marker of the beginning of the row, the rest of the markers are no longer needed.
1sc in the first loop of the leg, 10sc along the front leg, 1sc between the leg and body, 4sc along the body, 1 sc between the second leg and the body 10 on the second leg, 1 sc between leg and body, 13 sc on the side, 2 sc on the back leg 1 inc 4 sc, 1 inc, (2 sc 1 inc) x3 4 sc 1 inc 2 sc, 1 dec 12 sc in the body = 84
28-31. Without change 84sbn
32. 4sc 1dec 16sc 1dec 22sc 1dec 16sc 1dec 18sc = 80
33. 2sc 1dec (5sc 1dec) x3 17sc 1dec (5sc 1ub) x3 15sc = 72
34. 2sc 1dec (4sc 1dec) x3 16sc 1dec (4sc 1dec) x3 14sc = 64
35. 1sc (1dec 4sc) x3 1dec 11sc 1dec 6sc 1dec 4sc 1dec 6sc 1dec 8sc = 56
36. 3sc 1dec 6sc 1dec 15sc 1dec 12sc 1dec 12 sc = 52
37. 2sc 1dec 6sc 1dec 14sc 1dec 10sc 1dec 12 sc = 48
38. 1dec 8sc 1dec 7sc (2sc1ub) x5 9sc = 41
39. 1dec 6sc 1dec 8sc (1sc 1dec) x5 8sc = 34
40. 9sc 1dec 5sc 5dec 6sc = 27, put a marker at the beginning of the row
41. 1dec 8sc 1dec 5sc 2dec 5sc 1dec = 23
42. 14sc 2dec 5sc = 21
43. 13sc 2dec 4sc = 19
44. 13sc 1dec 4sc = 18
45-48. 18sbn, we continue knitting, we put a new marker, the thread is not cut off, start counting the rows from the beginning for convenience

Head
1. (1sc 1inc) x9 = 27
2. (1inc 1sc) x13 1sc = 40
3. (3sc 1inc) x5 19sc = 45
4.8sc 1inc (6sc 1inc) x2 22sc = 48
5.8sc 1inc (7sc 1 inc) x2 23sc = 51
6.8sc 1 inc (8sc 1inc) x2 24 = 54
7-12. 54sc
13. (7sc 1dec) x6 = 48
14. 48 sc
15. (6sc 1dec) x6 = 42
16-18. 42sc
19. (5sc 1dec) x6 = 36
20. (4sc 1dec) x6 = 30
21. (3sc 1dec) x6 = 24
22. (2sc 1dec) x6 = 18
23. (1sc 1dec) x6 = 12
Pull off hole

muzzle
knit oval 1.5 ch, from the second loop from the hook, 3sc, in the last loop 3sc, knit on the second side 2sc, in the last loop 2sc = 10
2.1inc 2sc 3inc 2sc 2inc = 16
4. (1inc 2sc) 2sc (1inc 2sc) x3 2sc (1inc 2sc) x2 = 22
5-6. 22sc (2 rows), fasten, cut the thread, sew on the spout, fill
Ears
1.6sc in ka
2. (1sc 1inc) x3 = 9
3. (1inc 2sc) x3 = 12
4. (3sc 1inc) x3 = 15
5. (1inc 4sc) x3 = 18
6-8. 18sc
19. (1dec 7sc) x2 = 16
20. (1dec 5sc) x2 = 14
21. (1dec 4sc) x2 = 12


Making a muzzle
Sew the muzzle to the level of 8-13 rows of the head inclusive

Make a tightening for the eyes as shown in the photo


Insert eyes, embroider or insert spout, do not be afraid experiment with tightening, and you can also put under the eyes piece of white felt


Poncho
We knit an oval, each row in a new color
1.16ch, from the second loop from the hook 14sc, into the last loop from the hook 3sc, 13sc on the second side of the chain in the last loop 2sc = 32, fasten cut thread

We knit the second and third row of PSN
2.1inc, 13PSN, 3inc, 13 PSN, 2inc = 38, fasten cut the thread
3. (1psn 1inc), 13psn, (1psn 1inc) x3 13psn, (1psn 1inc) x2 = 44 fasten cut the thread
Cut 3 colors into 6-7 cm pieces, about 40 pieces in total. add 2 threads together, zatkm fold in half and use a hook to thread under the loops along the edge of the Poncho, on each side of the oval


Tail
1.6sc in ka
2.6pr \u003d 12
3. 12sc
4. 6ub


