
#amigurumi #freepattern #freepatternamigurumi #crochettoppattern #crochet #crochetpattern #amigurumifox #crochetfox
What does amigurumi means?
The word Amigurumi comes from Japanese. The Japanese call handicrafts knitted with crochet and needle as Ami. The Japanese call the toys that are filled with objects such as fibers or cotton as Nuigurumi. The word Amigurumi is derived as a combination of these two words.
Amigurumi knitting techniques are very easy. You can find many handcrafts prepared with these techniques on my site. What is Amigurumi for beginners in Amigurumi handwork? How to knit amigurumi? In this blog, where you can find the answers to the questions with pictures, you will be able to learn about Amigurumi in all details.
I share in this blog are amigurumi cats, amigurumi dogs, amigurumi fish, amigurumi unicorn, amigurumi penguins, amigurumi parrot, amigurumi giraffe, amigurumi pigs, amigurumi bunnies, amigurumi cows, amigurumi sheeps, amigurumi bees, amigurumi dolls, amigurumi snakes, amigurumi mice, amigurumi elephants, amigurumi pumpkins, amigurumi pandas, amigurumi owls, amigurumi cartoon characters, amigurumi twetters, amigurumi caterpillars and more …
Also I’m sharing new amigurumi free patterns every day.
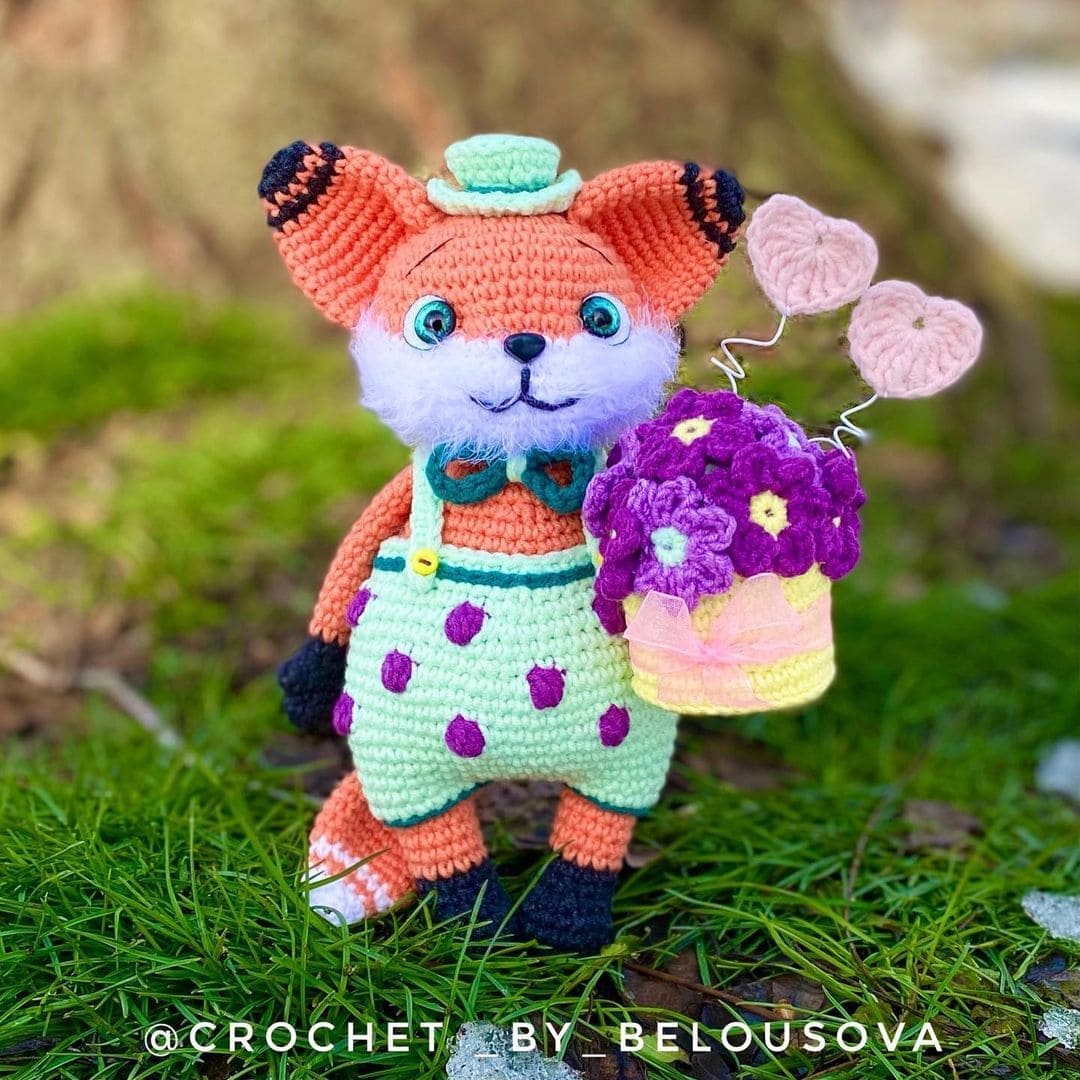
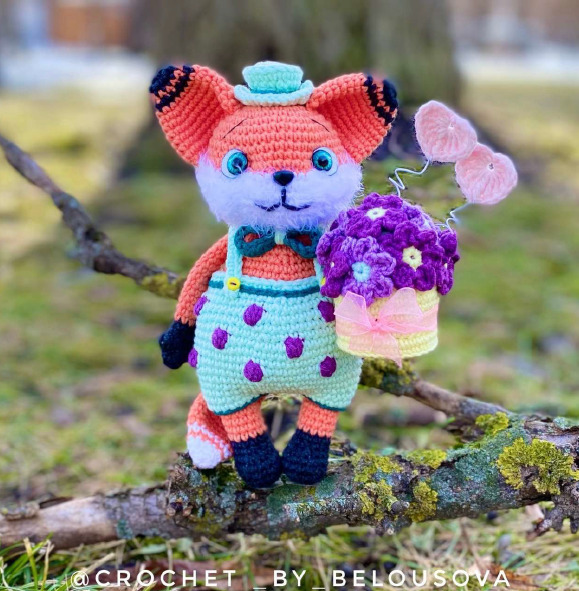
Todays daily new amigurumi free crochet pattern is Fox
I want to give you some informations about this pattern;
Free amigurumi pattern of Mr. Darcy, cute crochet fox who loves to wear a small hat and pants. The pattern is a free PDF download and it is available in English with US crochet terms. The finished amigurumi fox toy is about 19 cm (7.5″) tall.
Designed and photo by Irina Belousova
Instagram: @crochet_by_belousova
Materials:
Yarn: YarnArt Jeans (55% cotton, 45% acrylic, 50 g/160 m), colors: #23 – orange, #79 – light green, #63 – dark green, #28 – black, #01 – white, #50 – dark purple, # 72 – light purple, #67 – yellow, #74 – pink
Yarn for muzzle: Cotton Grass from Kamteks (100 g/ 220 m, 65% cotton, 35% polyamide), color #205 – white (any fluffy yarn can be used)
Hook size: 1.75 mm
10 mm safety eyes
White felt or sequins to decorate the eyelet
The spout is 9 mm long
Basting needles
Stitching needle
Scissors
Threads for sewing
Filler: holofiber, sintepon
Floristic wire with a diameter of 0.55 mm and a length of 20 cm
Ribbon 1 cm wide about 25 cm long
Cardboard
Glue
2 buttons with a diameter of 5 mm
Abbreviations:
AR – Adjustable Ring
sc – single crochet
ch – chain
inc – increase
dec – decrease
sl st – slip stitch
dc – double crochet
tr- treble crochet
dtr – double treble crochet
App – application
hdc – half double crochet
ll – lift loop
sl st – slip stitch
(…) – the number in brackets meansnumber of loops in a row
(…)*N – repeat N timeswhat is indicated in bracketsscbl – single crochet in the back loop
The size of the finished toy using these materials isabout 19 cm.
Flower arrangement – 7 cm.

In the Applicationto the crochet pattern you will find:
- How to pull off the hole – page 3
- How to connect parts (legs) – page 2
- How to fix the sewing thread on the knitted garment -page 4
- How to sew head to body – page 5
- How to tighten the eyelet – page 6
- How to change the color when crocheting in a spiral -page 8
- How to make a decrease from three loops – page 9
- How to knit by a jumper – page 10
*How to Crochet Popcorn Stitch (4 dc with a common base and one top) – page 11
Please see to PDF for detailed knitting pictures.
1.HEAD
We start knitting with orange yarn.
We fill the detail in the knitting process.
1.) 6 sc in AR (6)
2.) 6 inc (12)
3.) (1 sc , inc)6 (18) 4.) 1 sc, inc, (2 sc, inc)5, 1 sc (24)
5.) (3 sc, inc)6 (30) 6.) 2 sc, inc, (4 sc, inc)5, 2 sc (36)
7.) (5 sc, inc)6 (42) 8.) – 10.) 42 sc (42, 3 rows) 11.) 1 sc, (3 sc, inc)5, 1 sc, (3 sc, inc)5 (52) Change the yarn to fluffy white. 12.) 1 sc, (4 sc, inc)5, 1 sc, (4 sc, inc)5 (62) 13.) 1 sc, (5 sc, inc)5, 1 sc, (5 sc, inc)5 (72) 14.) 72 sc (72) 15.) 1 sc, (5 sc, dec)5, 1 sc, (5 sc, dec)5 (62) 16.) 1 sc, (4 sc, dec)5, 1 sc, (4 sc, dec)5 (52) 17.) 1 sc, (3 sc, dec)5, 1 sc, (3 sc, dec)5 (42) 18.) (5 sc, dec)6 (36)
19.) 2 sc, dec, (4 sc, dec)5, 2 sc (30) 20.) (3 sc, dec) (24)
21.) 1 sc, dec, (2 sc, dec)5, 1 sc (18) 22.) (1 sc, dec)6 (12)
We make 2 decreases and tighten the hole.
How to pull off the hole can be found in the appendix to the crochet pattern.
- EARS
We start knitting with black yarn.
We do not fill the part.
1.) 6 sc in AR (6)
2.) 6 inc (12)
Change the color of the yarn to orange.
3.) 12 sc (12)
Change the color of the yarn to black.
4.) (1 sc, inc)6 (18) Change the black yarn to orange and continue knitting. 5.) 18 sc (18) 6.) 1 sc, inc, (2 sc, inc)5, 1 sc (24)
7.) 24 sc (24)
8.) (3 sc, inc)6 (30) 9.) 30 sc (30) 10.) 2 sc, inc, (4 sc, inc)5, 2 sc (36)
11.) 36 sc (36)
Fold the part in half and knit 18 sc for both walls.

- LEGS (2 parts)
RIGHT LEG
We start knitting with black yarn.
We fill the part in the knitting process.
1.) 6 sc in AR (6)
2.) 6 inc (12)
3.) (1 sc, inc)6 (18) 4.) – 5.) 18 sc (18, 2 rows) 6.) 6 sc, (dec)3, 6 sc (15)
7.) 6 sc, decrease from three loops, 6 sc (13)
I explain how to make a decrease from three loops in
the App.
8.) 13 sc (13)
Change the color of the yarn to orange. You will find
how to change the color in the App.
9.) – 13.) 13 sc (13 , 5 rows)
Knit an additional 5 sc, fix the thread and cut.
LEFT LEG
We start knitting with black yarn.
We fill the part in the knitting process.
1.) 6 sc in AR (6)
2.) 6 inc (12)
3.) (1 sc, inc)6 (18) 4.) – 5.) 18 sc (18, 2 rows) 6.) 6 sc, (dec)3, 6 sc (15)
7.) 6 sc, decrease from three loops, 6 sc (13)
I explain how to make a decrease from three loops in
the App.
8.) 13 sc (13)
Change the color of the yarn to orange. You will find
how to change the color in the App.
9.) – 13.) 13 sc (13 , 5 rows)
Knit an additional 11 sc, do not cut the thread, continue
knitting.
4.BODY
We connect the legs. In detail how to connect the legs
is discussed in the App.
We continue to knit.
We collect 7 ch, we knit:
13 sc – on the right leg,
7 sc – by transition,
13 sc – on the left,
7 sc – by transition,
13 sc – on the right.
We put a marker, mark the beginning of the first row.
We should have 40 stitches in a row.
1.) (9 sc, inc)4 (44) 2.) 5 sc, inc, (10 sc, inc)3, 5 sc (48)
3.) (inc, 1 sc) *3, 17 sc, (inc, 1 sc) *3, 19 sc (54)
4.) – 8.) 54 sc (54, 5 rows)
9.) 4 sc, dec, 25 sc, dec, 21 sc (52)
10.) 17 sc, dec, 24 sc, dec, 7 sc (50)
11.) 4 sc, dec, 23 sc, dec, 19 sc (48)
12.) 16 sc, dec, 22 sc, dec, 6 sc (46)
13.) 4 sc, dec, 21 sc, dec, 17 sc (44)
14.) 14 sc, dec, 20 sc, dec, 6 sc (42)
15.) 3 sc, dec, 19 sc, dec, 16 sc (40)
16.) 13 sc, dec, 18 sc, dec, 5 sc (38)
17.) 3 sc, dec, 17 sc, dec, 14 sc (36)
18.) 12 sc, dec, 16 sc, dec, 4 sc (34)
19.) 3 sc, dec, 15 sc, dec, 12 sc (32)
20.) 11 sc, dec, 14 sc, dec, 3 sc (30)
21.) 3 sc, dec, 13 sc, dec, 10 sc (28)
22.) 9 sc, dec, 12 sc, dec, 3 sc (26)
Knit an additional 11 sc, sl st, fix the thread, cut off. - HANDS (2 PARTS)
We start knitting with black yarn. We fill from 1 to 6
rows.
1.) 6 sc in AR (6)
2.) 6 inc (12)
3.) – 4.) 12 sc (12, 2 rows)
5.) 3 sc, crochet popcorn stitch (4 dc with a common base and one top), 8 sc (12)
How to crochet popcorn stitch I show in detail in the
App.
6.) (2 sc, dec) *3 (9)
7.) 9 sc (9)
Change the yarn to orange.
8.) – 19.) 9 sc (9, 12 rows)
We knit an additional 2 sc, fold the part in half and knit by both walls. - TAIL
We start knitting with white yarn. We do not fill the part.
1.) 6 sc in AR (6)
2.) (2 sc, inc)2 (8) 3.) (3 sc, inc)2 (10)
Change the color of the yarn to orange.
4.) 2 sc, inc, 4 sc, inc, 2 sc (12)
Change the color of the yarn to white.
5.) (2 sc, inc)*4 (16)
Change the yarn to orange.
6.) (3 sc, inc) *4 (20)
7.) – 11.) 20 sc (20, 5 rows)
12.) (3 sc, dec)4 (16) 13.) – 14.) 16 sc (16, 2 rows) 15.) (dec, 6 sc)2 (14)
16.) – 17.) 14 sc (14, 2 rows)
18.) (5 sc, dec)2 (12) 19.) – 20.) 12 sc (12, 2 rows) 21.) (dec, 4 sc)2 (10)
22.) – 23.) 10 sc (10, 2 rows)
We knit an additional 2 sc, fold the part in half and knit
5 sc for both walls.
1) Glue the spout on the 12th – 13th row.
2) We cut out 2 circles with a diameter of 13 – 14 mm from felt. We glue eyes 1 cm in diameter on felt circles on the side as shown in the photo. Using a black felt-tip pen, decorate the eyes (draw around)
3) We glue the eyes on the 10-12th row of the head at adistance of 8 sc between them.
4) We make an eye tightening. Mark points from N 1 to N 4as shown in the photo.
We use a needle and orange thread for sewing.
The process is described in detail in the App.
5) We embroider a smile. Do not tighten the thread!
We mark the points with basting needles as shown in the photo.
Point N 1 is between 13 and 14 rows of head,
N 2 – between 14 and 15 rows, N 3 – between 14 and 15 rows
at a distance of 3 sc from point 2, N 4 – between 15 and 16
rows (mark it in the middle of points 3 and 2). Points N 5
and 6 are marked in the same way as points 3 and 4.
In a needle with a large eye we thread black yarn into one
thread, insert it into the last row of the head, leave a small
tail and bring the needle to point N 1, then to N 2, to N 3, to
N 4, to N 2, to N 4 , at N 5, at N 6, at N 2 and again at point
N 6. We bring out the needle next to the last row of the
head, tie a knot, cut off the tips.
6) We embroider the eyebrows
We mark the points with basting needles.
The upper ones (N 2 and N 3) are between 5 and 6 row at a
distance of 5 sc between them.
The lower ones (N 1 and N 4) are between 8 and 9 row at a
distance of 16 sc between them as shown in the photo on
the next page.
We thread a black thread into the needle in two threads,
insert the head into the last row, fix the thread and insert
the needle in order from N 1 to N 4. Draw the needle next
to the last row of the head, fix and cut off.
7) Sew on the ears.
In order to give the shape we need, we count 6 sc from the
last (18th) sc and bend the ear. For the left ear, bend it to
the left, for the right one – to the right.
We fix the ears with basting needles in a semicircle as
shown in the photo. We place the front part from 4 to 6
rows of the head, and the back – from 4 to 11 rows.
We use a needle with an orange thread for sewing. Sew on
the ears for both walls as shown in the photo.
8) Well, and the final part of the muzzle design. We comb
from 12 to 22 rows of the head with a brush (comb) for cats
🙂 Alternatively – a rigid part of the Velcro.
9) Sew the head to the body.
With basting needles we fix the body between 18 and 19
rows of the head.
We use a needle with an orange thread for sewing (see
App for how to fix the thread on a knitted product) and
sew on both half-loops (see App)
10) We attach the handles.
We fix the hands with basting needles between 20 and 21
rows of the body and sew for both half-loops using a
needle and an orange sewing thread.
11.) Pants
We knit the part from the bottom up. We start knitting
with light green yarn.
We collect a chain of 40 ch, with the help of sl st we close
it in a ring and knit in a spiral.
1.) 1 ll, 40 sc (40)
2.) 40 sc (40)
3.) (9 sc, inc)4 (44) 4.) 5 sc, inc, (10 sc, inc)3, 5 sc (48)
5.) (11 sc, inc)4 (52) 6.) (25 sc, inc)2 (54)
Next, when crochet popcorn stitch, change the color topurple. For details on how to change the color when crocheting in a spiral, see the Application to the App.
We knit the purple thread on the seamy side.
7.) (8 sc, popcorn)6 (54) How to crochet popcorn (4 dc with common base and one top) I show in detail in the Application to the App. 8.) – 9.) 54 sc (54) 10.) 4 sc, popcorn, (8 sc, popcorn)5, 4 sc (54)
11.) (25 sc, dec)2 (52) 12.) 12 sc, dec, 24 sc, dec, 12 sc (50) 13.) popcorn, 8 sc, popcorn, 7 sc, popcorn, 8 sc, (popcorn, 7 sc)3 (50)
14.) (23 sc, dec)2 (48) 15.) (10 sc, dec)4 (44)
16.) (20 sc, dec)*2 (42)
We knit sl st, fix the thread, cut it off.
Form a loop of dark green yarn and knit a row of sl st on the first row and between rows 15 and 16 as shown in the photo.
We put on the pants on the body, sew between the legs as shown in the photo with a needle and dark green sewing thread.
12.) Pants straps (2 parts)
We use light green yarn. We cast on 19 ch, from the second loop from the hook we knit 18 sc, fix the thread, cut off.
We fix the straps with basting needles as shown in the photo (from behind we tuck them under the pants).
Fix the front with 2 yellow buttons 5 mm in diameter and a
needle with purple thread for sewing.
Sew / glue the shoulder straps and back.
13.) Hat
We use light green yarn.
1.) 6 sc in AR (6)
2.) 6 inc (12)
3.) (1 sc, inc)6 (18) 4.) We knit by the jumper: 18 sc (18) 5.) 2 sc, dec, (4 sc, dec)2, 2 sc (15)
6.) (3 sc, dec)3 (12) 7.) (inc)12 (24)
8.) (1 sc, inc)*12 (36)
We knit sl st, fix the thread, cut it off.
Form a loop of dark green yarn and knit a row of sl st. between the 5th and 6th row of the hat.
We glue / sew on from 1 to 3 rows of the head.
14.) Bow
We use dark green yarn.
We collect a chain of 22 ch and from the second loop
from the hook we knit 21 sc. We fix the thread, cut it off.
We tie the resulting ponytails into a knot.
Fold both ends to the middle as shown in the photo and sew with a needle with dark green sewing thread.
We wrap with light green yarn in the middle 3-4 times and tie the ends on the seamy side.
We glue/sew a bow in the middle of the body in the neck area.
15) Sew on the tail.
We fix it with basting needles obliquely as shown in the photo. Sew on with a needle and orange sewing thread for both half loops. In order for our tail to hold securely, we sew / glue at the point marked with a basting needle as shown in the second photo.
16) Flower composition.
Flower basket.
We use yellow yarn.
1.) 6 sc in AR (6)
2.) 6 inc (12)
3.) (1 sc , inc)6 (18) 4.) 1 sc, inc, (2 sc, inc)5, 1 sc (24)
5.) (3 sc, inc)6 (30) 6.) 2 sc, inc, (4 sc, inc)5, 2 sc (36)
We circle the part on cardboard, cut out the bottom.
7.) We knit by the jumper: 36 sc (36)
8.) – 16.) 36 sc (36, 9 rows)
We knit sl st, fix the thread, cut it off.
We insert our bottom inside.
Top.
We use light green yarn.
1.) 6 sc in AR (6)
2.) 6 inc (12)
3.) (1 sc , inc)6 (18) 4.) 1 sc, inc, (2 sc, inc)5, 1 sc (24)
5.) 24 sc (24)
6.) (3 sc, inc)6 (30) 7.) 2 sc, пinc, (4 sc, inc)5, 2 sc (36)
We knit sl st, fix the thread, cut it off.
Flower (11 pcs)
We start knitting with yellow yarn.
1.) 6 sc in AR, we close it in a ring with sl st in the first loop (6)
Change the color to purple. We knit 6 petals, in each loop
of the AR: (2 ch, 2 dc, 2 ch, sl st. in the same loop, sl st in the next) * 6
After tying the last petal, knit sl st into the first loop, fix the thread, cut it off.
We fill the basket and sew to the top.
We fix the flowers with basting needles and glue them, cut
off the tails. We wrap with a ribbon, tie a bow.
We knit hearts (2 pcs)
We knit with pink yarn.
In AR: (ch)2, (tr)3, (dc)2, tr, (dc)2, (tr)3, (ch)2, sl st in AR.
We fix the thread, cut it off.
Cut a 10 cm long wire for each heart. Fix the wire on the
bottom of the heart. On the wrong side, you can
additionally fix it with glue. We wrap a pencil around it,
stretch it a little. Paste between the flowers at the top.
Can be additionally fixed with glue.
Amigurumi Baby Girl Free Pattern Amigurumi Bear Amigurumi Bear Free Pattern Amigurumi Bear With Amigurumi Bear With A Heart Amigurumi Bear With A Heart Free Pattern Amigurumi Bird Amigurumi Bull Amigurumi Bunny Amigurumi Bunny Girlfriends Free Pattern Amigurumi Bunny Liliac Free Pattern Amigurumi Cat Amigurumi Chick Amigurumi Chicken Amigurumi Cow Amigurumi Dalmatian Dog Amigurumi Dalmatian Dog Free Pattern Amigurumi Dog Amigurumi Doll Amigurumi Doll Free Pattern Amigurumi Easter Chick Amigurumi Giraffe Amigurumi Giraffe Free Pattern Amigurumi Girl Amigurumi Girl Free Pattern Amigurumi Hedgedog Amigurumi Melman The Giraffe Free Pattern Amigurumi Snowgirl Amigurumi Teddy Bear Amigurumi Teddy Bear Keychain Free Pattern bear Bunny Cat Crochet Bear Crochet Bear Free Pattern Crochet Bunny Crochet Cat Crochet Dog Crochet Doll Crochet Girl Crochet Hedgedog Crochet Snowgirl Dog Doll Snowgirl

